Whenever you search a topic in Google you always see an author image in left side of SERPs. These author are Google verified author. You can also be a Google verified author. There are lots of benefits associated if you are Google verified author.
Benefits of Google Verified Author:
1. More Visibility of your blog in Search Engine Result Pages.
2. Provides credibility to the Author of the post.
3. Your articles get a unique outlook which attracts users to select your website only.
4. Many Internet Webmasters believes that their blog traffic has been drastically increased after Google Verification process.
5. Gives a personal edge too.
6. It increases your reliability and people are able to recognize you as a branded company.
Here are the steps to become a Google verified author.
Step #1: If you don't have Google+ profile then make a "Google+ profile".
Step#2: Now if you don't have about author page then make a "ABOUT AUTHOR" page on your blog or website.
Step#3: Now anywhere in "ABOUT AUTHOR" page place this link
<a href=”https://plus.google.com/113073129986384123692″ rel=”me”>Join me on Google+</a>
- Change profile link in blue colour with your Google + profile link.
- You can also change "Join me on Google +" text with your desired word.
- Please do not remove rel="me" tag.
Step#4: Now place this following link in header or footer of your blog or website.
<a rel=”author” href=”http://Digitzz.blogspot.com/p/about.html”>About</a>
- Change author page link in blue colour with your Author page link.
- Please do not remove rel="author" tag.
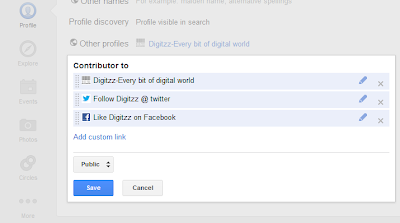
Step#5: Now go to your Google+ profile and click on edit profile. Add a link back to your author page in the “Contributor to” section of your links.
Add a new custom link with a label and URL of your blog/website author page and save it.
Confirm your verification and Picture in Search Engine?
To check your markups and tags properly inserted or not, go to Rich Snippets Testing tool to insure your markup is implemented correctly simply by entering a link to any of your posts in the testing tool. If everything will be OK then your image will be shown.
How much time did Google takes to show your Picture in SERP’s:
Well! It depends on your blog PageRank. If your blog/site have Google PageRank more than 1 then it almost takes 2-3 days.
Well! It depends on your blog PageRank. If your blog/site have Google PageRank more than 1 then it almost takes 2-3 days.
For blogs having Page Rank 1 or 0 should Ping Google servers to notify this change via this url-
DONE !


I cannot find the place for placing the tag in step 4.pls show me a photo ar video describing this
ReplyDeleteHi Akash,
ReplyDeleteThanks for showing your interest.
You can place this tag in hyperlink of about page.
for e.g. in my blog i have linked my name "Ravindra Gupta" at bottom written in copyright text with my profile page with this rel=author tag.
you just view its source code to see how i put this tag at line no. 2447.
or
simply give your blog/website address i will tell you appropriate place.
Regards
Ravindra gupta
Digitzz